Among the many services offered by Microsoft Azure, the Azure Speech Services stands out as one of the most innovative and powerful tools for businesses and developers. This service provides APIs that enable developers to add speech-related functionalities into their applications, thereby enhancing their capabilities and user experience.
Azure Speech Services is a comprehensive suite of cloud-based speech services offered by Microsoft Azure. This suite includes a range of services such as speech-to-text, text-to-speech, speech translation, and speaker recognition. These services harness the power of advanced machine learning algorithms to convert spoken language into written text, generate natural human-like speech from text, translate speech into different languages, and identify speakers based on their unique voice characteristics. Azure Speech Services is designed to handle both real-time and batch processing, making it suitable for a wide variety of applications.
An integral part of Azure Speech Services is the Azure Batch Transcription Service(ABTS). This service is specifically designed to transcribe large volumes of audio data into text. It takes in audio files as input and outputs a detailed transcription of the spoken content in the audio. Azure Batch Transcription Service is particularly useful in scenarios where businesses need to transcribe large amounts of audio data quickly and accurately.
In the context of Azure Batch Transcription Service, network topologies play a critical role in ensuring data privacy and sovereignty. Network topologies determine the path that data travels from the source to the Azure cloud and back. This path can have significant implications for data privacy and sovereignty, especially in scenarios where data needs to cross international borders. By carefully designing the network topology, businesses can ensure that their data remains within specific geographical boundaries, thereby complying with local data protection regulations and maintaining the trust of their customers. Moreover, a well-designed network topology can also enhance the performance of the Azure Batch Transcription Service by reducing latency and increasing throughput.
In this post, I show various networking topologies related to this field, highlighting key features and points of reflection.
A typical workflow
An automatic transcription workflow that uses Azure Batch Transcription Service typically consists of the following steps:
- Upload audio files to an Azure Storage container.
- Submit the transcription job to ABTS with parameters such as the audio file URLs, the transcription language, and the transcription model.
- ABTS asynchronously accesses the storage that contains audio files, reads them, and produces the transcriptions.
- Once finished, ABTS saves the transcription to destination Azure Storage container.
- While ABTS runs, the customer can check the transcription status and wait until it completes.
- The customer retrieves the resulting transcription from the destination Azure Storage container.
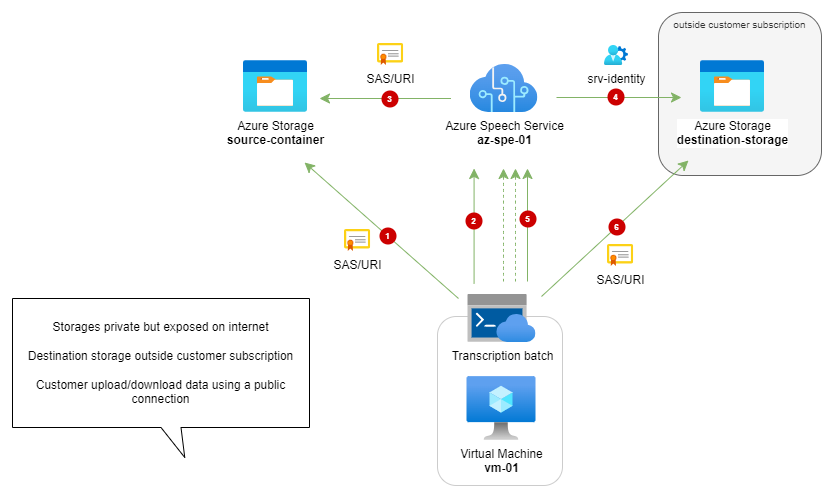
Scenario 1: Public internet
In this scenario, I show the default configuration, where ABTS reads data from a storage account that is publicly exposed on the internet, and dumps the results in a storage managed by the service itself, therefore outside the customer’s Azure subscription.
download drawio version of this schema from this link.
In this case, even though confidentiality is guaranteed by managed access through SAS Tokens, the storage and services are all exposed on the internet, thus potentially vulnerable.
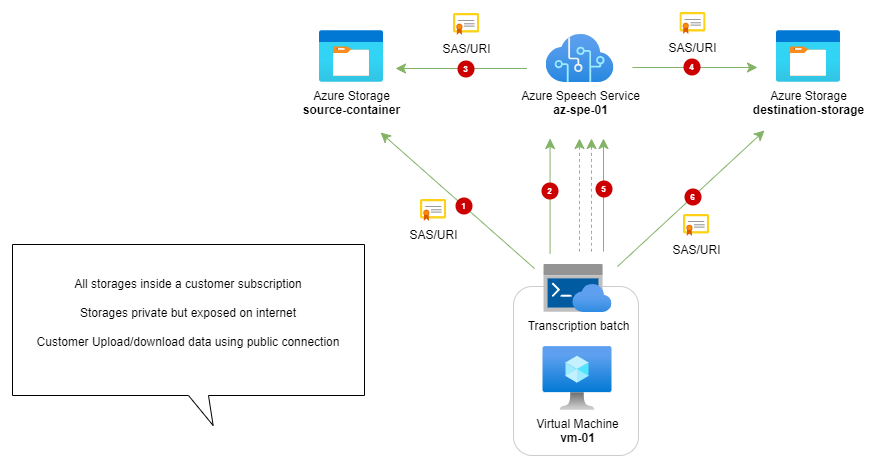
Scenario 2: Customer’s destination storage
In this scenario, entirely analogous to the first one, a destination Storage Account is created on the customer’s subscription. At the end of the operation, ABTS copy the contents directly to this storage.
download drawio version of this schema from this link.
Also in this case, confidentiality is guaranteed exclusively by the SAS tokens of the Storage Account, but all communication occurs through the internet to ensure both the customer and the Azure service can access the data they need to work on.
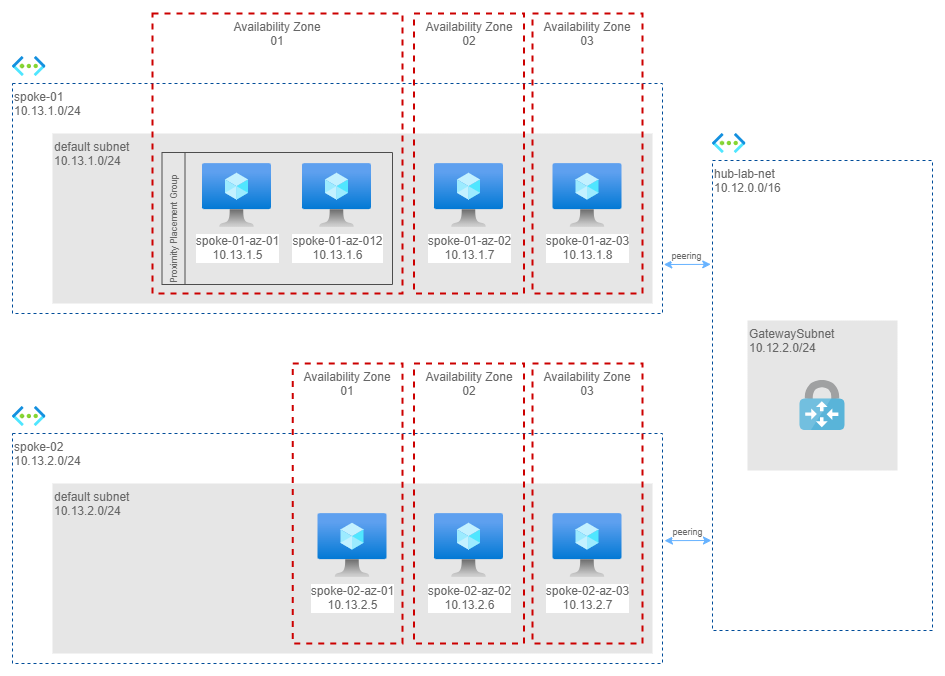
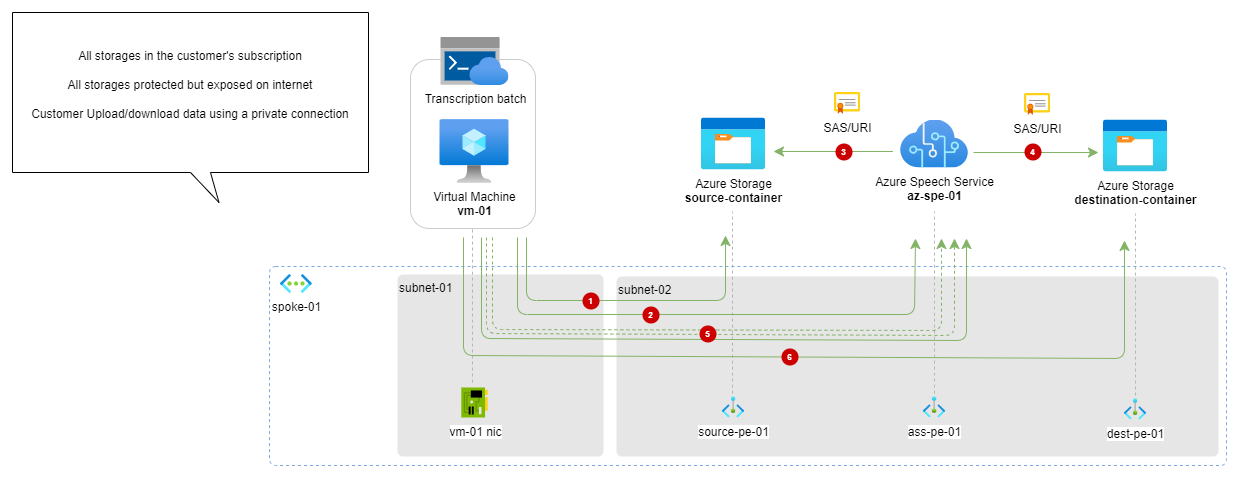
Scenario 3: Using Private endpoint
In this scenario, all the resources involved (VM, storage and ABTS) are exposed through private endpoints on a customer’s internal network.
download drawio version of this schema from this link.
Compared to the previous scenario, the upload of data to the storage and the download of results occur through a secure channel internal to the customer’s subscription. However, the storage accounts must remain publicly accessible via the internet to allow ABTS to function properly.
Scenario 4: Use the Bring your own storage (BYOS) Speech resource for speech to text
this service is currently in preview: to request access use this link
Bring your own storage (BYOS) is an Azure AI technology for customers who have high requirements for data security and privacy. The core of the technology is the ability to associate an Azure Storage account, that the user owns and fully controls with the Speech resource. The Speech resource then uses this storage account for storing different artifacts related to the user data processing, instead of storing the same artifacts within the Speech service premises as it is done in the regular case. This approach allows using all set of security features of Azure Storage account, including encrypting the data with the Customer-managed keys, using Private endpoints to access the data, etc.
In BYOS scenarios, all traffic between the Speech resource and the Storage account is maintained using Azure global network (but all resource must be in the same region), in other words all communication is performed using private network, completely bypassing public internet. Speech resource in BYOS scenario is using Azure Trusted services mechanism to access the Storage account, relying on System-assigned managed identities as a method of authentication, and Role-based access control (RBAC) as a method of authorization.

download drawio version of this schema from this link.
Consider the following rules when planning BYOS-enabled Speech resource configuration:
- Speech resource can be BYOS-enabled only during creation. Existing Speech resource can’t be converted to BYOS-enabled. BYOS-enabled Speech resource can’t be converted to the “conventional” (non-BYOS) one.
- Storage account association with the Speech resource is declared during the Speech resource creation. It can’t be changed later. That is, you can’t change what Storage account is associated with the existing BYOS-enabled Speech resource. To use another Storage account, you have to create another BYOS-enabled Speech resource.
- When creating a BYOS-enabled Speech resource, you can use an existing Storage account or create one automatically during Speech resource provisioning (the latter is valid only when using Azure portal).
One Storage account can be associated with many Speech resources. We recommend using one Storage account per one Speech resource.
- It is reccomended that Storage account and the related BYOS-enabled Speech service are located in the same region.
Setup BYOS: https://learn.microsoft.com/en-us/azure/ai-services/speech-service/bring-your-own-storage-speech-resource?tabs=azure-cli#byos-enabled-speech-resource-basic-rules
]]>