
You can use the OAuth 2.0 client credentials grant specified in RFC 6749, to access web-hosted resources by using the identity of an application. This type of grant is commonly used for server-to-server interactions that must run in the background, without immediate interaction with a user.
The OAuth 2.0 client credentials grant flow permits a web service (confidential client) to use its own credentials, instead of impersonating a user, to authenticate when calling another web service. For a higher level of assurance, the Microsoft Identity Platform also allows the calling service to authenticate using a certificate or federated credential instead of a shared secret.
In this walk-through I show how to use a certificate to request an access token to Azure Active Directory, using the OAuth 2.0 client credential flow. As client I use a custom c# DotNet 6 application and MSAL Library.
Alternatively, it is possible to use any other library able to compute an assertion, and post it to Azure Active Directory.
01 - App registration
On your Azure Active Directory, create an app registration:
- Open https://portal.azure.com/#blade/Microsoft_AAD_IAM/ActiveDirectoryMenuBlade/RegisteredApps
- Click [New Registration]
use the following parameters:
- Name:
my-sample-app-registration - Supported account Types:
Accounts in this organizational directory only - click [Register]
02 - Create and upload a certificate in Azure AD
You can use Azure to create a self signed certificate.
- Open an instance of Azure Key Vault or create a new one if needed.
- From Azure Key vault open
Certificatesblade and click on [Generate or Import]
use the following parameters:
- Method:
Generate - Certificate Name:
my-sample-certificate - Type of CA:
Self-signed Certificate - Subject:
CN=my-sample-common-name - Valid Period:
12 months - Type:
PKCS #12 - Click [Create]
When certificate creation is completed:
- Download certificate in PFX/PEM format (with private key).
- Download certificate in .CER format (without private key).
NOTE: A .pfx file includes both the public and private key for the associated certificate. A .cer file only has the public key, it can be used to verify tokens or client authentication requests.
Now, go to the Application Registration just created, select Certificates and Secrets and upload the certificate .CER just created.
The result will be something like:
| Thumbprint | description | start date | expires | id |
|---|---|---|---|---|
| 4DDASE(sample)… | my-sample-certificate | … | … | 1aa986a(sample) … |
03 - Create DotNet 6 client application
Create a directory on your machine, and copy there the .PFX file downloaded previously.
Create the following client-certificate-test.csproj file:
<Project Sdk="Microsoft.NET.Sdk">

  <PropertyGroup>
    <OutputType>Exe</OutputType>
    <TargetFramework>net6.0</TargetFramework>
    <RootNamespace>client_certificate_test</RootNamespace>
  </PropertyGroup>

  <ItemGroup>
    <PackageReference Include="Microsoft.Identity.Web.Certificate" Version="1.25.0" />
    <PackageReference Include="Microsoft.Identity.Web.TokenCache" Version="1.25.0" />
  </ItemGroup>

</Project>
create also the following program.cs file:
using Microsoft.Identity.Client;
using Microsoft.Identity.Web;
using System;
using System.Security.Cryptography.X509Certificates;
using System.Threading.Tasks;

namespace daemon_console
{
    // For more information see https://aka.ms/msal-net-client-credentials
    class Program
    {
        static void Main(string[] args)
        {
            try
            {   RunAsync().GetAwaiter().GetResult();   }
            catch (Exception ex)
            {   Console.WriteLine(ex.Message);  }
        }

        private static string certificateFullPath = "C:\\temp\\client-certificate-test\\nicold-my-sample-certificate-20220614.pfx"; // Replace with your certificate path
        private static string applicationID="ace7a10d-aaaa-4a01-8663-1440b6b78cb9"; // replace with your application ID
        private static string authority="https://login.microsoftonline.com/dac2b1d5-5420-4fad-889e-1280ffdc8003/"; // replace with your AAD authority

        private static async Task RunAsync()
        {
            ICertificateLoader certificateLoader = new DefaultCertificateLoader();

            // full path Certificate File
            var myCertificate = X509Certificate2.CreateFromCertFile(certificateFullPath);
            X509Certificate2 myCertificate2 = new X509Certificate2(myCertificate);

            var app = ConfidentialClientApplicationBuilder.Create(applicationID)
                .WithCertificate(myCertificate2)
                .WithAuthority(new Uri(authority)) // Tenant ID
                .Build();

            app.AddInMemoryTokenCache();

            // With client credentials flows the scopes is ALWAYS of the shape "resource/.default", as the
            // application permissions need to be set statically (in the portal or by PowerShell), and then granted by
            // a tenant administrator.
            string[] scopes = new string[] { "https://graph.microsoft.com/.default" }; // Generates a scope -> "https://graph.microsoft.com/.default"
            //string[] scopes = new string[] { "api://ace7a10d-aaaa-4a01-8663-1440b6b78cb9/.default" }; // custom API on same tenant

            AuthenticationResult result = null;
            try
            {
                result = await app.AcquireTokenForClient(scopes).ExecuteAsync();
                Console.WriteLine("Token acquired");
                Console.WriteLine("Token: " + result.AccessToken);
            }
            catch (MsalServiceException ex) when (ex.Message.Contains("AADSTS70011"))
            {
                // Invalid scope. The scope has to be of the form "https://resourceurl/.default"
                // Mitigation: change the scope to be as expected
                Console.WriteLine("Scope provided is not supported");
            }
        }
    }
}
Note. Update this code with your ApplicationId, certificate file path and your authority URI
Execute this application from Visual Studio Code. If everything works you will receive an output similar to:
Token acquired
Token: eyJ0eXAiOi(more...).eyJhdWQiOiJodHRwczovL2dyYXBoL(more...)HyKJ.fGZvr(more...)1QbbdYQ
copy encoded Token and paste it in https://jwt.ms. You should see something similar to the following:
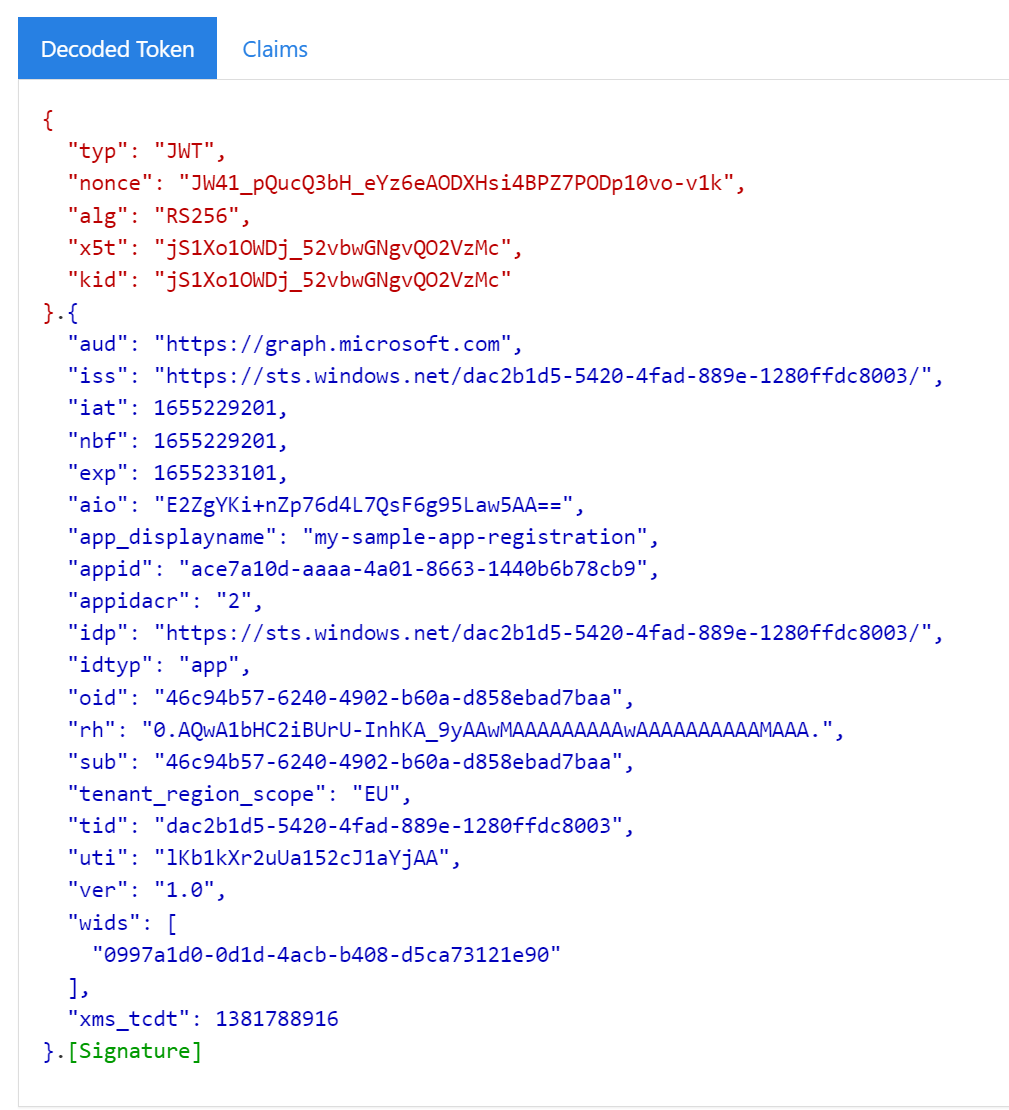
As you can see you have an Access Token able to call Migrosoft Graph (aud field), issued by Azure AD (iid and idp fields).
More information
- Microsoft Identity OAuth 2.0 client credentials flow: https://docs.microsoft.com/en-us/azure/active-directory/develop/v2-oauth2-client-creds-grant-flow
- Create a certificate in Azure Key Vault: https://docs.microsoft.com/en-us/azure/key-vault/certificates/quick-create-portal
- Certificate Credential, Assertion Format: https://docs.microsoft.com/en-us/azure/active-directory/develop/active-directory-certificate-credentials
- MSAL Microsoft Authenticatio Library: https://docs.microsoft.com/en-us/azure/active-directory/develop/msal-overview
- A .NET Core daemon console application using MSAL.NET to acquire tokens for resources: https://github.com/Azure-Samples/active-directory-dotnetcore-daemon-v2
- .NET 6: https://docs.microsoft.com/it-it/dotnet/fundamentals/
- Visual Studio Code: https://code.visualstudio.com/